4-9 : Business Card DesignIf you have a business, you need to hand out cards and send correspondence... Right? A standard finished business card is 2" x 3.5" though when you setup the artwork you will need a bleed of 1/8th". The bleed is used to extend your background past the cut lines incase it's off a little when it's cut down to size, you don't want a sliver of white on one edge (your background should be 2.127" x 3.627"). With that in mind, you should also keep your text and logo an 8th of an inch inside of the cut line, so you'll want to make sure that your text is within the 3.25 x 1.75 inch area of your card layout. We generally use www.overnightprints.com for our printing needs. They have templates for every product they sell in every standard graphics program, to help you get started with your project (Download Templates). 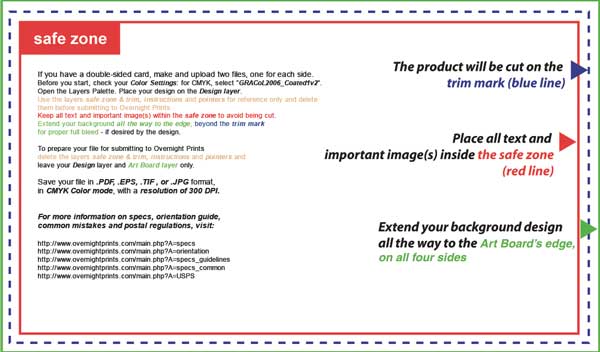
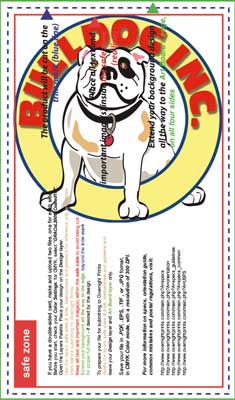
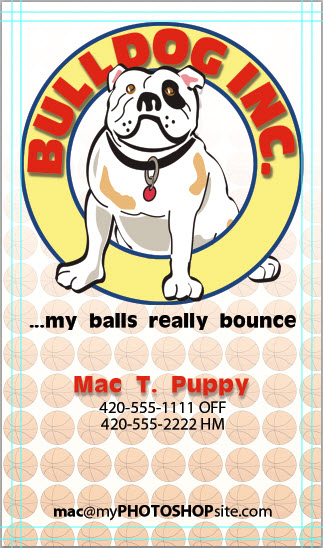
We'll start with their PhotoShop Business Card Template. So, download that and open it in PS. We also want the Bulldog Logo open because we are going to use that as well. There are two ways to move the logo to the template, find the file and Drag & Drop it into the Template Window. This will insert the FLATTENED PS file to a New Layer or replace the Active Layer if there is nothing on it and it is Selected (don't forget to hit the Enter Button to Place it). The other way to move it is by opening it in another window and Select All>Edit>Copy Merged (Ctrl+A, Shift+Ctrl+C), which copies the content of all of the visible layers. Then switch back to the Now we have our logo in the Template File so we can decide how we want to design the card. It fits pretty good at that size but if we needed to, we could resize it easily (1-15). Also, it fits pretty good either Vertical or Horizontal so you (or your client) have to decide how you want to design it.
You can turn OFF and ON the Visibility of the Guidelines and Safe Zone Layers, I usually turn the Safe Zone Layers OFF and use the Guides for reference instead. Adding the Text is easy (1-12) Deciding how big to make it can be tricky. As a general rule you don't want a font that is smaller than 8pts and I normally don't go smaller than 9 or preferably 10pts if possible. The company name, if needed should be 12 to 15pts... however, this is strictly a design choice. Some clients want their resume on their business card TELL THEM NO! A simple and easy to read card is way more effective. Generally, only the person handing out the card thinks that everyone wants to know that much about them, the person getting the card probably doesn't even want it and if they do, it's to remember their name incase they run into them again or to be able to call or email them later.
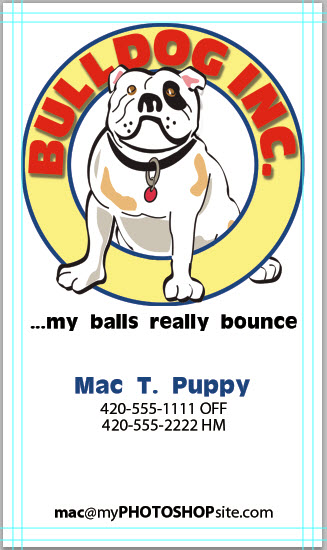
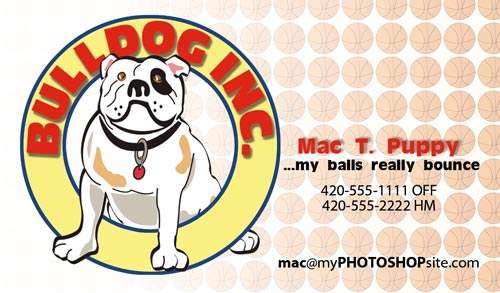
A Corporate Identity needs to be cohesive, when you hand someone your card and they go to your website, they should know that they have arrived. Using the same fonts, logo design, colors, general layout, the list goes on... In the examples above I used the same layout and then added the basket ball background from the web page (which gives the tag text a different meaning :). I didn't care for the blue text over the orange balls in the background so I changed the text color and added a drop shadow to make it more dynamic. I could make more than a dozen different variations in about 5 minutes, not all of them would be good though! :) The point is, once you have the elements, it is very easy to throw a card together in record time. Play around with it and see what you come up with.
With digital prints, it doesn't matter how many colors your design has, it all cost the same. As for card stock, you generally have one option, with two choices, Matte or Matte with a Gloss UV Coating. OR you can add a "Spot UV" as an example, to just the logo text or as a repeating pattern in the background. Also, for just a little more, you can have a full color 2 sided card. We should probably think about saving this to send off for printing. File>Save As... (Shift+Ctrl+S) You can save your file in .PDF, .EPS, .TIF , or .JPG format, in CMYK Color Mode, with a resolution of 300 DPI (1088 pixels x 628 pixels). I normally save as a TIF because it has more color information. However, some places only except PDFs or JPGs. It is always best to check with the Print Company that you will be using. You can usually find a Spec File posted on their website somewhere. For a reference, refer back to Tutorial 2-15 regarding saving files, if needed. Using Perforated Business Card Paper for your inkjet or laser printer... Then it is just a matter of dropping your saved graphic or graphics into the template and printing it. Imagine the possibilities, you could be someone different everyday! (You can discuss that with your conscience later)
Conclusion Reference The Do's and Don'ts of a Business Card... Click Here What is Spot UV?
|
||||
<< Previous Tutorial |
Return to List |
Next Tutorial >> |
||
 Template Window and Paste (Ctrl+V) it. You might see a color shift because the original Bulldog PS file is an RGB and the Template File is a CMYK (because printers use CYMK and monitors use RGB). You can convert the original image to a CMYK and Adjust the Color Balance (
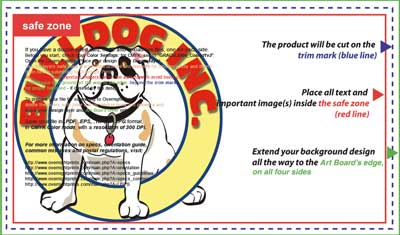
 Before the days of quality digital prints, a one color, off-set card on your choice of card stock was the standard.
 Owned and operated by The Art Department, Chester, NE |
Last Update: |