1-9 : Messing around with the Smudge tool

Tutorial 1-1 Intro to Photoshop
Tutorial 1-2 Raster vs. Vector
Tutorial 1-3 Marquee Tool Selection
Tutorial 1-4 Lassos and Magic Wands
Tutorial 1-5 Move Tool & Crop Tool
Tutorial 1-6 Selecting and working with Color
Tutorial 1-7 Fixing Images with the Clone Tool
Tutorial 1-8 Gradients, Fills & Erasing
Tutorial 1-9 Smudge, Blur and Sharpen Tools
Tutorial 1-10 Dodge, Burn and Sponge
Tutorial 1-11 Pen and Path Tools
Tutorial 1-12 Text Tools
Tutorial 1-13 Vector Shape Tools
Tutorial 1-14 Eyedropper / Colorpicker (& notes)
Tutorial 1-15 Distorting and Transforming
Tutorial 1-16 Introduction to Layers

1-9 : Editing images with Blur, Sharpen and Smudge

Intro
There are times when you want to make an image a little sharper, or possibly blur some details (wrinkles?). There are ways to adjust the entire images, and those will be dealt with in Level 3. These tools allow you to adjust just the portion of the image you want to. This allows for either subtle or dramatic changes. Working with these will make those 'non-perfect' images a little nicer and can save some photos. These tools are shown in a video at the bottom of the page.

Blur Tool
The Blur Tool is on a flyout with the Sharpen and the Smudge tools. Previous versions of Photoshop allowed you to access these tools with a Shift+R, this is no longer available.

Blur Flyout

Using the Blur Tool is a matter of selecting the brush size and hardness and then deciding if you want to change any options. Below is the Option Bar for the Blur Tool.

blur options

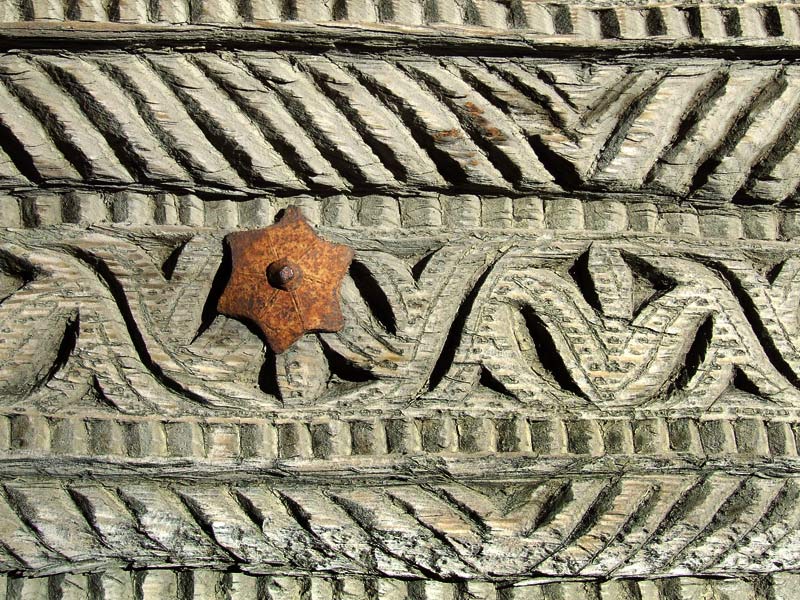
So... as usual, you see a droplist for presets, setting for the brush size and hardness, followed by the mode. Next is the strength. This allows you to set how much blur (max=100%) or how little you want to use. Sample all layers means that the tool looks at any all visible layers and makes the adjustment on the current working layer.

To work with the Blur Tool, open up a photo or use this one I took in Santa Fe. You'll see that it has a lot of detail, so you will be able to readily see the effects of this tool. Activate the tool, then select a size of brush about 100 pixels. Left-click on the image and Drag your cursor. You should see a slight to heavy blur appear on the image depending upon the hardness you have set. Try other settings and notice the differences.

Working on the overall image is covered in Tutorial 3-10.

Sharpen Tool
The Sharpen Tool is pretty much the opposite of the Blur Tool. Instead of decreasing contrast between pixels, the sharpen tool increases it. Below is an image showing a sharpened area (left), normal area (middle) and blurred area.

Sharpen and Blur in Photoshop

The effects were applied at 100% to maximize the difference. If you have the Santa Fe image open, you can use the Sharpen Tool to make the rusted metal area a little sharper. Try this and see how it works.

Over-sharpening is something you want to avoid. This happens when you add so much sharpening that the contrast looks unnatural. Try to find the areas that were over-sharpened in the image below.

Over sharpened image

This tool is just for sharpening areas, here is another tutorial for working on the entire image or selected parts.

Smudge Tool
Out of the three tools, the Smudge Tool is generally used the least. The other two have common practical applications in photography post processing. The smudge tool can be used for blending two areas together or creating special effects. You'll see that you have similar options on this tool as with the others. Play around with it and get a feel for what it can do. Try different strength levels.

The smudge tool can also be used to create a painted look from a photograph. The video below shows the Smudge tool in action.


Conclusion
If you look at images from cheap digital cameras, or slightly out of focus photos, you can usually fix them with some sharpening (but be careful not to over-sharpen). Blurring works when there are parts of the image you don't want to have sharp - license plates, or bank account numbers (Select an area with the Marquee tool first). But you'll find that knowing when to use these tools is as important as how to use them. Watch for over-sharpening.

Reference
Find out how to sharpen a knife
Read about the Native American Smudging Ceremony

The video content presented here requires JavaScript to be enabled and the latest version of the Adobe Flash Player. If you are using a browser with JavaScript disabled please enable it now. Otherwise, please update your version of the free Adobe Flash Player by downloading here.


<< Previous Tutorial

Return to List

Next Tutorial >>

Owned and operated by The Art Department, Chester, NE
This web site is protected by Copyright 2008 - 2017 ©

Last Update:


Please visit our other sites:

| www.myARTdepartment.com | www.TheCenterofCreativity.com | CustomGamingDesign.com | FreeAutoCADTutorials.com |

myIllustratorsite.com | myAfterEffectssite.com | myAutoCADsite.com