2-6 : Hip and Trendy StylesIntroduction:
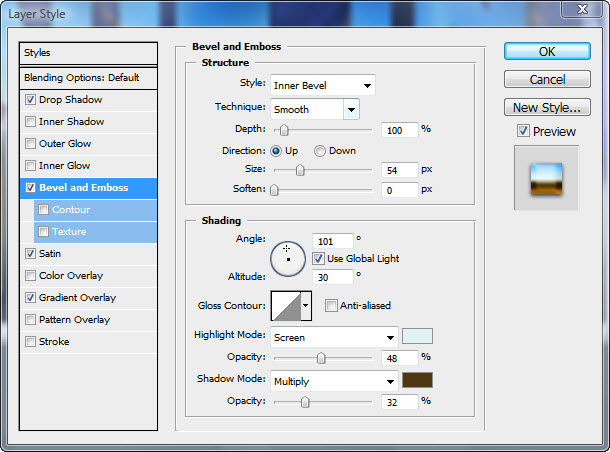
Try clicking on a few styles to see what they do, and how they change the Text Layer. Select the "Chromed Satin" icon from the "Styles Palette" and you will see the "fx" list change. And below is what the default settings look like- Kind of boring, isn't it? We can make some quick and easy adjustments to the "fx" and make this a much better looking graphic. So let's open the "Blending Palette" by double-clicking next to the layer name. and see what we can do.
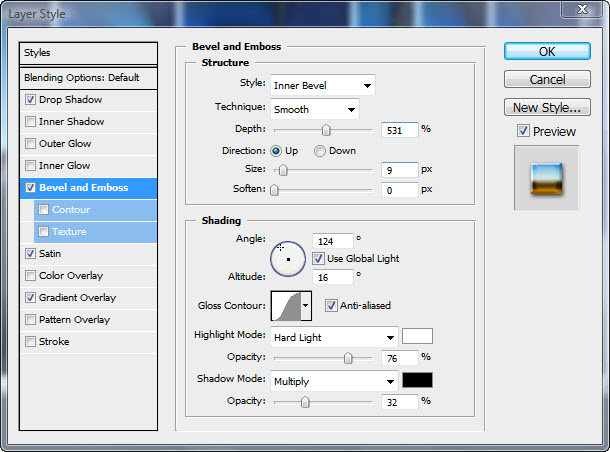
Really, the only the only thing that needs fixing is the "Bevel", you can't even see it in the text because the Size is set too high. The width of the letter is about 40 pixels and the size of the bevel is set to 54 pixels. We need to bring that size down to something that we can see, something that fits within the letter, like 9 px.
You will find that you'll make several changes to the setting before you find the correct combination. I have personal preferences and you will too over time. For instance, I prefer the look of the "Gaussian Contour" and to add "Anti-Alias".
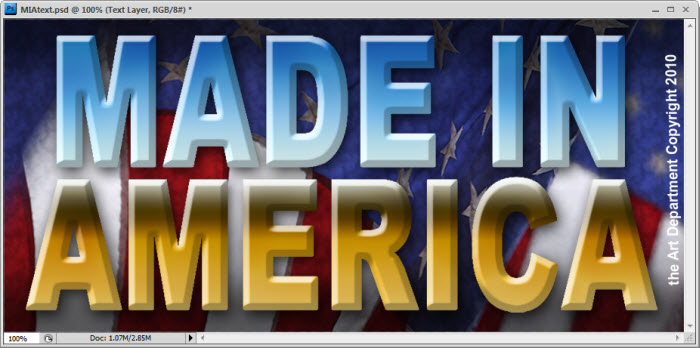
I also prefer a sharper shadow and highlight so I moved the "Angle" to the upper left. I changed the "Highlight Mode" from "Screen" to "Hard Light" and changed the color from a light blue to white and increased the "Opacity" to 76%. I left the "Shadow Mode" as "Multiply" but changed the color to "Black", this gives the text a more dynamic look. The last thing that I did was change the overall "Depth" of the bevel to 531% to make it "pop" more.
I left the other "fx" alone because I liked how they look, though you could make adjustments to those as well if you like.
Once you have created a style that you like, you can save it to use later by clicking on the "New Style" button in the upper right of the "Layer Style Palette", a simple dialog window will open, which will give you the option of including the "Layer Effects" (all of the effects such as shadow or bevel) and including the "Blending Options" (Your General or Advanced Blending settings). Make your choices and click "OK", all of the settings that you made will be saved and added to the "Style" list as a preset with whatever name you have given it.
Click through the styles and see what they do. Make changes to the settings and make them the best they can be. You can draw a small box on a new layer and turn it into a webpage button using the "Buttons" or "Web Styles" Add a fancy outline to some text using "Text Effects". The more that you experiment these styles, the better understanding you will have of how "fx" work. To install "Style Presets" that you download from the net, place the *.asl files into: Conclusion So far in this level we have talked about Layers and how they work, Masks and how they work with Layers, Layer "fx" and how to use "Style Presets" and making them. We've learned a bit about Channels and a lot about the Filter Gallery. You should have a pretty good understanding of Photoshop by now. In the rest of this level we will cover the rest of the basics then move on to specific interests, such as manipulating photos graphic design or designing a website.
Reference |
||||||
<< Previous Tutorial |
Return to List |
Next Tutorial >> |
||||


 PS comes with many "Style Presets" and the style window shows only the default set until you open other libraries. Click on the drop down menu icon in the upper right of the "Style Palette". You will see a list of libraries, starting with "Abstract Styles". When you click on this one or any of the other libraries, a dialog box will open asking if you would like to "Replace current styles.." If you click "OK" the current styles will be replaced with the new style set. If you choose "Append" the new style set will be added to the bottom of the styles that are currently open. You can always revert back to the default set by selecting "Reset Styles..." from the drop down menu. If you have made new styles, be sure to save them or they will be lost if you replace them.
Owned and operated by The Art Department, Chester, NE |
Last Update: |