|
For the beginner, saving files in the correct format can be very confusing! Let's see if we can clear a few things up... I'm going to assume that you already know how to save files, right?! (if not... well, you couldn't have made it this far). Also, there is a video at the end of the page for more explaination.
The Basics for saving a file
Navigate to File>Save As (Shift+Ctrl+S) A window will open and ask, where you want to save the file. This is important, you want to find it later. Again, I can't stress enough the advantages of being organized with your files. I have a folder in which I keep other folders so I can find things easily... it might look something like this, C:\Data\Clients\ArtDept\Graphics\AD-Logo.pds. Once you have found your file a home, you need to give it a name. Then you need to select a format. Your "Save Options" will change with the format you chose. These should be pretty self explanitory... Layers, no Layers... etc. As for "Use Lower Case Extension", there are some UNIX Based internet servers that prefer lower case for file extensions. One thing to keep in mind is that the bigger it is, the better it looks. AND the larger the file size is, AND the slower your computer/program will run. Larger isn't always better. A good guide is to decided roughly how big the final image will print out, get the image size close to that and make it 300 DPI if you want a high quality image. 150 DPI if you want it to look good and want to cut down the file size and have it print faster. 72 DPI if you are planning to use it on the web or send it in an email.
Once you have saved a file once, you can select "Save" (Ctrl+S). If you want to save it as a different format or file name, you "Save As..." Remember to always keep an original, you might want to use it for a different project and or enlarge it.
Another thing to remember is that you should make your changes and adjustments to a larger image then reduce it for the final image. For example, if you "Adjust" the image "Hue & Saturation" or "Levels" do that before you reduce the size to be what it needs to be.
Saving Files for Email and Web Pages=
There is nothing worse than checking your email and finding that your best friend sent you 10 pictures of their new baby, in 10 different e-mails and each one is 10 gigs... You don't want to be this person! Your, and all of your friends and family's, monitors are 72 Dots Per Inch or DPI. Your overall display might be something like 1280 x 1024... your Mom's display might be set to 800 x 600. So, with this in mind- if you send a picture to them of Timmy Jr. playing catch with Buck, and you have taking that photo as a high res image with your digital camera, you will need to reduce the size. Your picture is probably 300 DPI, 4000x3000... that is way to big to even fit on the screen full size... Remember... what your screen resolution is? Will the image even fit on your monitor? Probably not... so, why waste all of that space and bandwidth? (Not to mention get your email account blocked by your friends)
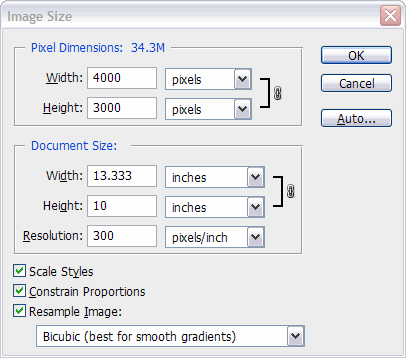 Navigate to the Menu Bar>Image... and select "Image Size..." (Alt+Ctrl+I) A dialog box will open with options. This is where you will change the size of your image. See how the "Resolution:" is set to 300 DPI , this is high res. We want to change that to 72 DPI. Also note the file size, which is at the top "Pixel Dimensions: 34.3M" ...that's 34 Megs! The average mail box is 10M. Just by changing the DPI to 72 we have already reduced that to 1.98M. Navigate to the Menu Bar>Image... and select "Image Size..." (Alt+Ctrl+I) A dialog box will open with options. This is where you will change the size of your image. See how the "Resolution:" is set to 300 DPI , this is high res. We want to change that to 72 DPI. Also note the file size, which is at the top "Pixel Dimensions: 34.3M" ...that's 34 Megs! The average mail box is 10M. Just by changing the DPI to 72 we have already reduced that to 1.98M.
When you change the resolution size, the Pixel Dimensions automatically change too (960x720). For this application though, we will also change the pixel size to 800x600 pixels. See the bracket and chain on the right? That will allow you to change the size proportionately. If you click on the chain it will turn this off and you can force the size to what ever you like. (Or you can uncheck the "Constrain Proportions" at the bottom)
You want to make sure that "Scale Styles" is checked if you have applied styles and want them to scale. Otherwise, if you reduce the image size and have a stroke around text or a shape, it will stay the same size and that might not be a good thing.
OK, with all of that said and done, the size is reduced to 1.37M, which is still too big to send through email, so we'll need to reduce that even more. Navigate to File>Save for Web and Devices... (Alt+Shift+Ctrl+S) A window with your picture will open, on the right are some options that we will need to adjust. (There are options on the left too, but we don't need those right now)
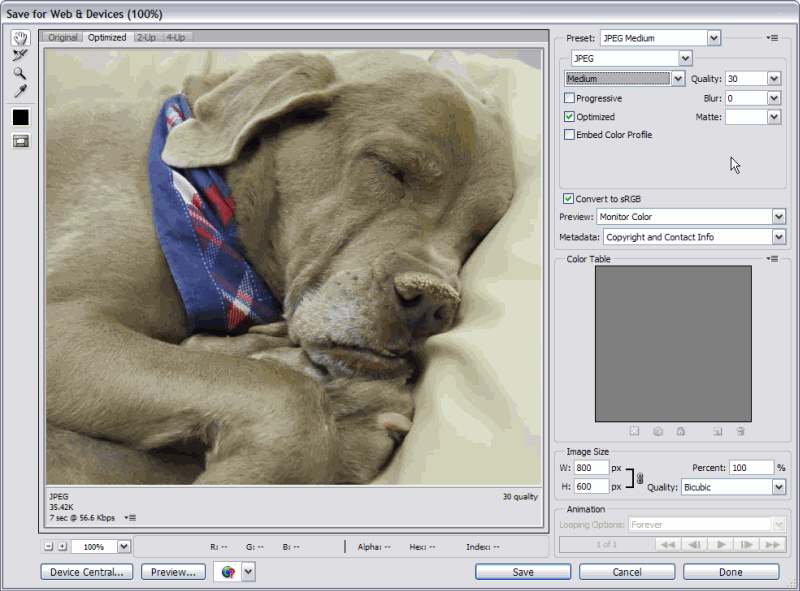
You well find "Presets" on the top, I chose "JPEG Medium" which brought the size down to 35.42K... that's a very manageable size to send to Mom! The one thing to watch out for is how that effects the image quality. Tosh's bandana is starting to look pixelated so if I increase the "Quality" to say 50 instead of 30, it will look a lot better and increase the file size to 58.4K. Really, you can go higher than that but if you don't need to, don't. I don't normally save files higher than 100K and the more that you sent in an email or post on a page, remember that those file sizes add up and if they are too big, it could take a while to download. (Download Tosh Here and try different settings)
In the end, the important number here is the "Quality" and then in the lower left, the "File Size" I also always "Optimize" and never set a "Blur". Your size should already be set correctly but if it isn't, you can change that too. If by chance you forgot to change the size to be "Monitor Compatible" you might get a pop up window that tells you it is too big to be properly displayed. You can still say "ok" and change it in the window, though I find it easier to do that in the work area since it handles resizing better.
Other file formats suitable for email and internet applications would include "GIF" and "PNG". The .png format is more for the program "Adobe Flash" and it saves transparency information and has a much smaller file size than a JPG. GIF's also save a smaller file size, mainly because you can limit the amount of colors used in the file (JPG's limit the overall quality of an image). GIF's also save transparency information, which you can specify. For instance, if your background is yellow and you want that to be the transparent color, you would simply select that color. For more detail instructions on GIF's and JPG's, see Level 3 Tutorial 3-8.
Saving Files for Adobe Illustrator=
Photoshop Files or PDF formatted files are native Adobe files and will open in AI and retain the layer and transparency information. Or you can chose to open it as a Flattened Image. You can also bring in JPG's and Targa's if your image doesn't have transparency. PNG's, TIF's, and PDF's all have transparency information attached to it. There are other file options but these are the most standard for raster images. You can also "Link" the image so that if you change it in PS later, it will automatically update. Careful when doing this, it could cause you problems if you move the original to a different folder, or you send the file to someone else and forget to sent the linked files as well. File size isn't usually an issue with this application though if it's too big, you will slow your refresh rate down considerably.
Saving Files for Word=
You can insert photos or images into Microsoft Word easily as a JPG, TIF, PNG, PCT, and many other formats. What size you make your final image is dependent on what you plan to do with the document. You may not know for sure so the best rule of thumb is to make it a bit bigger rather than smaller, you can always reduce the size in Word.
Saving Files for your Client=
ALWAYS save a PSD file for yourself and your client, in case they ask for it or you need to make changes. I can't stress how important that is, no matter who it's for. If you aren't sure what the client needs, it is best to ask them. If they don't know (which is often the case), ask them what they are using it for, then you'll need to decided. You might decided wrong but that's ok because you have the raw PSD file, Right? A good guess would be a 300 DPI, PDF or JPG. Though they might want a TIF. We'll get into file formats in depth in another tutorial.
Saving Files for Print=
A PDF is becoming the file of choice because it is easily read by a large variety of applications, though JPG's are just as common. If you save it as a PSD file, you might need to "Save As..." an earlier version because not everyone has upgraded to the latest and greatest version (You can usually find what the file format requirements are for the print company as well as the size requirements, somewhere on their website). You will find that most online printing companies use a CMYK rather than RGB. You will also notice that when you convert an RGB to CYMK the colors change, in most cases, become muted. You need to plan for this and find the correct colors that translate well or adjust them if you have to convert them. Basically, printers use CMYK and the internet and your monitor use RGB. To change the "Color Mode" navigate to Image>Mode>CMYK you might get an warning box, just say "OK".
Let's say that you are saving a file for a business card that you are going to send to an online printer. That file will need to be saved as a CMYK, 300 DPI, 1088x638 pixels or 3.627x2.127 inches (which will give you a .127 bleed... more on that in Level 4).
Note: When you manipulate and create images in the digital environment, it's all RGB -- although programs like Adobe Photoshop allow you to convert to CMYK and effectively simulate the CMYK color space on-screen. (Photoshop is actually working behind the scenes in another color space.) |
Conclusion
There is so much to know about saving and preparing files. I'm sure that I didn't cover it all here but this will get you started and you can research more specific information on your own, as you need it.
Reference
For a great and thorough explanation of RBG vs CMYK Click Here...
|