4-7 : Website DesignHey, I want a web page too! We're going to build our own though... well, I'm going to show you how to lay it out. (You'll need to go through the Dream Weaver Tutorials when we finish them, to learn how to make it work on the internet.) Show me how to make a page Let's start by gathering up a couple of files that you saved earlier...
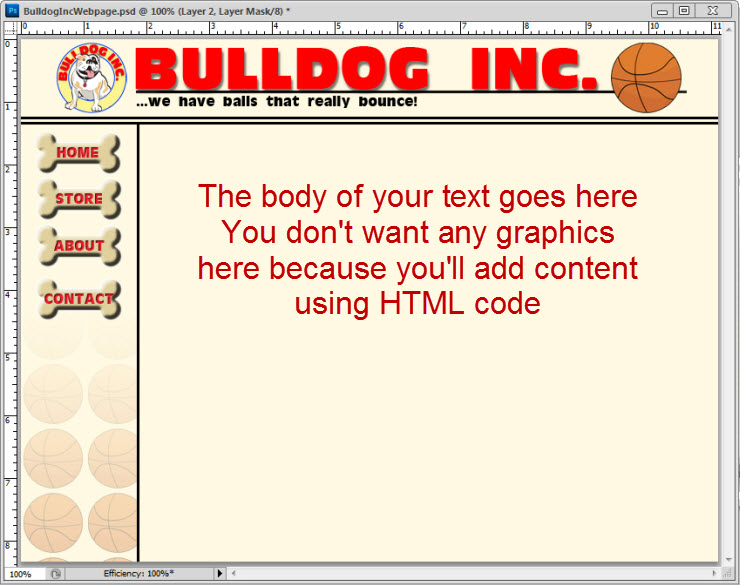
There are entire volumes about website stats: Standard overall size, Browser compatibility, Functionality, etc. We're not going to get into all of that and make this page 600x800 pixels. Start a new 600x800 window in PS (1-16). You can select the "Web Preset" from the drop down menu, it has a list of standard sizes to get you started or you can just type in the size that you want. You'll want to have the other two files open in other windows as well, so we can cut and paste from them. The basic idea is to create a design using everything that you have learned about layers and tools. I'm going to throw something together and then we'll look at setting it up to slice correctly.
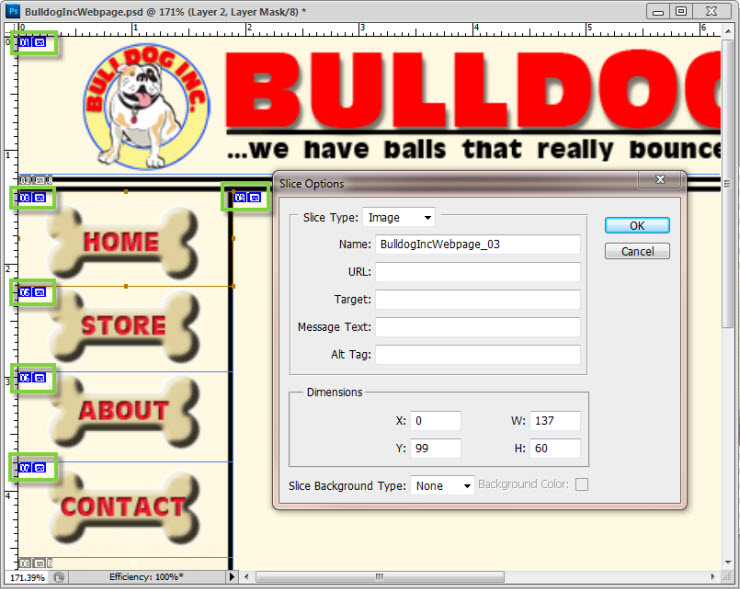
This is your basic layout, it can be as fancy or as simple as you like. It can be cut into as many slices as you like. Logically, we want all the buttons, the top header section, and the body of your text area to be individually sliced so that we can change the graphics later and/or function to them in the HTML code. If you Double Click on the little box, a dialog box will open and you can make changes to the Slice Options. By default, the name is the File Name and followed by the Slice # but you can change that if you like to something like, "Home". When you have an image that has a lot of slices, it can get confusing fast. If you already know the file names and locations you can fill that in now or you can add that information later in the HTML code editor. SO, with that said, you can add a URL: here, for instance, Slice #3 is where the HOME Button will be located and we would put the full URL or web address for that HTML file, something like http://www.bulldoginc.com/index.html. Your Target area is where that file will open, leaving it blank will open it in the current internet window. Typing in the word Blank, will open it in another window, leaving the current window as is. These two things are the internet functions of that slice, what will happen when it is published to the web and you click on it. However, you can not add the Roll Over image here, that needs to be done in your HTML Editor. So there are limitations and personally, I never setup my internet option in PS. But it's nice to know that you can! and something that you would do AFTER you are finished setting your slices because the numbering could change even with a minor adjustment.
A word of warning: Slices can get very messy. You can easily end up with little slivers of slices in places that you don't need or want them to be. You can Drag & Drop slices around the page or you can select a slice and resize it using the handles. If you "Right Click" on the Slice, a dialog box will open and you can Delete stray slices and Divide them or if you select multiple slices, you can Combine them. This gets tricky...
After designing your page and cutting it to little pieces, we want to save it all out or "Publish" it. The best way to do this is through "File>Save for Web & Devices..." Because it will make the smallest file size for the web. Once you have Clicked the Save Button, you also have options to save the HTML file and the Images or just the Images, etc. Since this is the first time we are saving it, we want the HTML and the Images. Later, if you make changes to just part of it like the Home Button, you can select just that image and save it. It will automatically save it with the same file name provided you haven't renamed it. This is how you would make the Roll Over image for the buttons, but we don't want to Overwrite those, they will need a new name. First you need to change the button images with the Button Down images that we made in Tutorial 4-5 once they are in place and with the visibility of the Button Up images turned OFF. Save it again, this time hold down the Shift key and Click on each Slice, once all 4 are selected, Click on the Save Button. Change the name to something that makes sense like, ButtonDown and it will save each button selected with that name followed by the Slice#. You will add these new image files to your HTML file using a code editor. Let's go see what it looks like on the web... www.BulldogInc.com
Conclusion Reference |
|||
<< Previous Tutorial |
Return to List |
Next Tutorial >> |
|
|
|||
Owned and operated by The Art Department, Chester, NE |
Last Update: |