4-4 : Creating an Animation, Save as a GIF
Introduction
This tutorial will show how to create an animated GIF file in Photoshop CS4. GIFs are used instead of JPGs because they can contain frames for animating as well have transparent areas. This makes them ideal for web graphics. Remember an animation can be a simple or complex as you need, but each frame you add in your animation increased the size of the file. You need to keep this in mind so that your page loads quickly.
We are going to take the Bulldog, Inc. logo that we just created in Tutorial 4-3 and add some basic animation to it. The first thing to decided is what he is going to do. Should he jump in the air and spin around in typical bulldog fashion? Or walk around the logo and come through the back of the banner, then sit? We can make this as complicated or as easy as we like, but since this is a BEGINNERS course, let's make our bulldog pant.
Overview of the Animation Tools:
Both "Views" use some of the same options such as the "Play Controls" which should be familiar (play, pause, forward, etc). There is a drop down menu in the upper right which gives you additional options or help in navigating around the palette. There is also an icon in the bottom right that allows you to switch between "Frame View" and "Timeline View".
Which view you use will depend on what you want to do with the animation and how much control you want to have over keyframes. In the end, you'll want to jump between them. The "Timeline View" gives you more control over layers and timing. The "Frame View" is easier for quick animations, guess which one we'll be using today? (We will discuss how to use the "Timeline View" in a more advanced tutorial later, but feel free to play with it and see what it does.)

Frame Animation Palette: Behind the scenes, the "Animation Tool" takes a picture of the workspace at that moment in time. You don't have much control over the image other than turning a layer off and on (from the "Layers Palette"). And you can add "Tweens" to create new frames with changes to the "Opacity", "Position" or "Effect" (the "Effect" also called "Styles" would be changes made in the "Blending Options" Tutorial 2-2) You would add a new frame by clicking on the "New Layer" icon, now you have your second animation frame. In the "Frame View" it is also very easy to change the duration of a frame using the "Drop Down" menu below the frame image and selecting a duration (we'll cover that in a minute). You can also change the "Playback" options in the drop down menu, from play "Forever", "Once", or however many times you want it to loop. When you switch to the "Timeline" view, all of the changes that you made in the "Frame View" will be converted to "Keyframes" on the timeline.

Timeline Animation Palette: The timecode view allows you to enlarge or reduce the visible work area using a slider so you can zoom in and out of the timeline keyframes (it's located in the middle of the bottom, just after the "Play Controls"), this is helpful when working on a long animation with a lot of keyframes. It also has an "Onion Skin" view which shows a fading transition between changing images/layers. You can add comments at "Keyframes" in the animation by moving the timeline marker to an animation point and clicking on the "Stopwatch" to the left, next the word "Comments". A dialog box will open and you can type anything that you like there, for instance "First pant", "Second pant", etc. this makes your life easier when you are looking for a particular point in the animation. You can also adjust layer keyframes by clicking on them and dragging or add keyframes by clicking on the add keyframes icon, found on the left. It will add a key where ever your timeline marker is, on the animation option layer ("Position", "Opacity", or "Style") for the image layer that you have active (We'll cover this in a later tutorial).
Getting Things Setup to Animate Them:
To do this simple animation we'll need to open the BulldogInc.psd file that we created (You saved that, right?). This original file is pretty large, we don't don't need it that big for what we will be using it for, so lets reduce the size to 300x300 px (at 72 dpi). Reducing the file size will make it easier to work with and we have no reason to use a huge animated gif on a website or in an email, as learned in Tutorial 2-10 on resizing for other Applications. 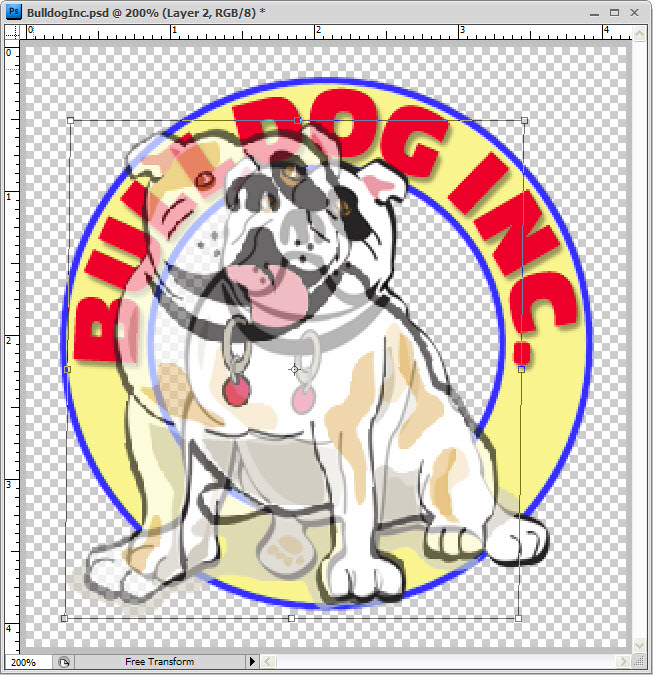
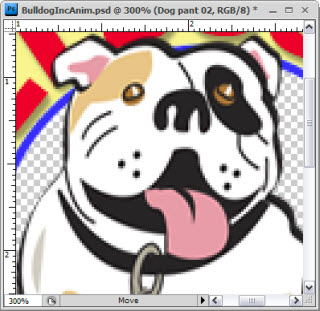
With that done and "Saved As..." something else like BulldogInc-Anim.psd (so you'll know what it is later by looking at the file name), let's open the bulldog-pant300.png file (Found here). Note: If you copy the file from the web, you may get a black background - you don't want that. This will be one of our layers in the animation. We need to bring this image into the new file. With the bulldog-pant300.png active, "Select All", "Copy", then with the BulldogInc-Anim.psd file active, "Paste" or the easier way is "Ctrl +A", "Ctrl +C", then "Ctrl +V". The new dog layer will be too big and doesn't line up exactly right for what we need so we will have to adjust the size and position using the "Transform Tool" (Tutorial 1-15). Also make sure that it is the top layer above everything else. 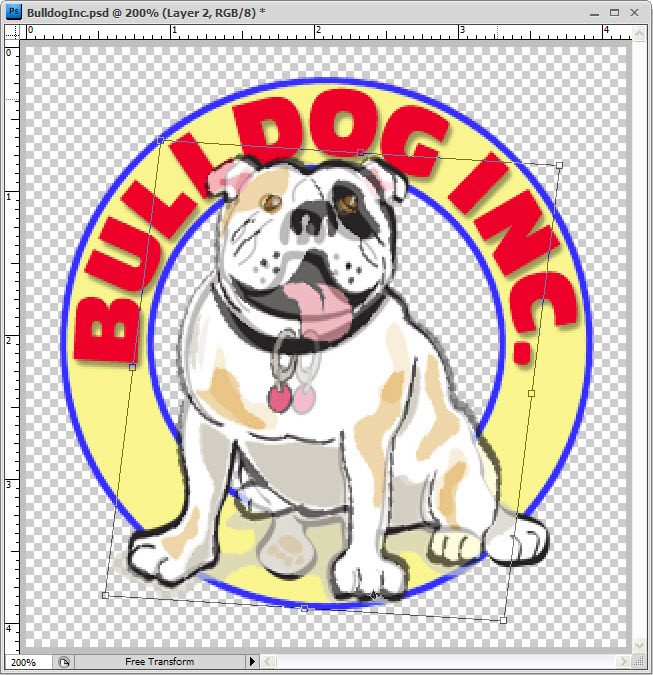
I like to give the layer on top an "Opacity Adjustment" of about 70%, so that I can see through the image to easier line it up to what's underneath(This is called onion skin in the biz and can be changed back easily after we're finished). So to do this, we navigate to the "Layers Palette". With the new bulldog-pant layer active, we will go to the "Opacity: Slider" in the top right of the palette and adjust it to 70%. "Ctrl +T" will select the "Transform Tool" so that you can now adjust the image to fit or line up better to our original bulldog image below. You need to decide the best placement, in this case his right paw would be where his weight will shift so make sure to line the right paw in both images first and move the pivot point to the lower middle of his paw, then push and pull it until you have it lined up.
To test it, turn the "Opacity" back up to 100% and turn the layer on and off using the "Visibility" icon next to the layer (the little eye). If the movement is too exaggerated then turn the opacity back down and adjust it some more. (You can see what it should look like by putting your mouse over the image to the left.)
Navigate your way to the "Windows" drop down from the "Menu Bar" and turn on the "Animation" window. (if you don't see it there, select the "Show All Menu Items" at the bottom.) By default, the "Animation Palette" will open along the bottom of the program.
You can view and edit your animation using "Frames" or the "Timeline". You can adjust the "Length" of your animation or the "Duration" of a frame. You can tell individual layers to be "On" or "Off" at a certain point in the timeline. You can also add "Tweens" between selected frames, which will add options to transition the image from one frame to the next, weather it be a fade or move.
 Because the timeline doesn't support "Transformation" keys, we will need to make more layers for our panting pup animation. Right now we just have one frame with the dog sitting idle and one with the dog sort of panting. Hold your curser over the image to see what this looks like animated, right now he just sticks his tongue out at you... that's not what we want! We need a couple more frames with his tongue actually panting and maybe a bit of body movement as he breaths. Because the timeline doesn't support "Transformation" keys, we will need to make more layers for our panting pup animation. Right now we just have one frame with the dog sitting idle and one with the dog sort of panting. Hold your curser over the image to see what this looks like animated, right now he just sticks his tongue out at you... that's not what we want! We need a couple more frames with his tongue actually panting and maybe a bit of body movement as he breaths.
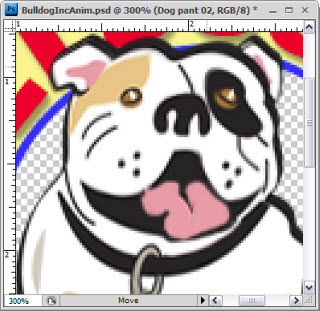
In the "Layers Palette" copy the dog panting image layer. (Either click on it and drag it to the "New Layer" icon at the bottom, or "Right Click" on it and select "Duplicate" from the drop down menu.) This will open another layer with the same name and the word "copy" after it, change the label name, so that you know it's the second pant image (ie: Dog pant 02) We will make our changes to this layer. For now we will ignore the "Animation Palette" and make the changes to his face.
There are a couple of ways to do this, but we're going to use the "Paint Brush" tool (Ctrl +B) to change the shape of the tongue (Tutorial 1-6). So zoom into the face so that you can see what you're doing (Tutorial 1-1). I keep my left hand on the keyboard when I am painting so that I am able to change the brush color quickly using the "Alt" key, it changes the "Brush Tool" into the "Eyedropper Tool" while you're holding it down. Adjust your brush size to be small enough to draw within the space and give it a hard edge with "100% Opacity" (I used a 3px round shape). I started with black and painted the pink out of the collar, then changed to white and painted it out from under the chin. Then using the pink I changed the shape of the tongue and put the black outline back around it.
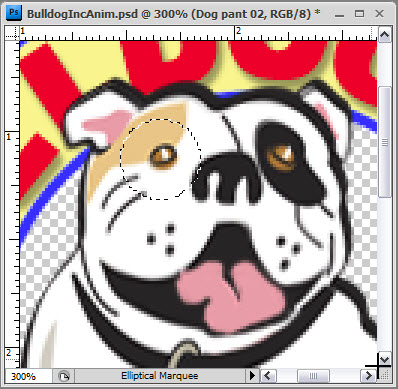
We need to add a little overall movement to the dogs face, lift the jowls up, shift the ears, bring the eyes down. We will do this with the "Smudge Tool" (Tutorial 1-9), little bits at a time. Select the "Smudge Tool", make the size 25 px and the "Hardness 100". If you give it a "soft edge", it will just "smear" instead of "move" the pixels. Place the brush over one of the eyes and click and drag down a pixel (if it moves more than a pixel, you might have the "Snap" turned on, turn it off in the "View" drop down menu). Do this to both eyes, the ears, and move the jowls up a pixel. You don't need to move anything more than a pixel, we are just trying to get small movements and not distorts the image too much (It needs to still look like the same dog in the end!) You'll want to change the brush size as needed, play with it, you'll see what I mean. And if you don't like the results then "Undo" and do it again. This could be tricky at first, but once you get the hang of it, you'll find it to be quick and easy.
So, we have made a frame with the tongue more in his mouth, we have adjusted the facial features a little to give him some movement, BUT NOT TOO MUCH! Now lets add movement to the whole image to make him look like he's taking in a breath. Back out of the image and "Select" the image from the "Layer Palette" (Tutorial 2-4)
"CTRL +Right Click " then "Transform" (Ctrl +T), exactly the same way that we did before to adjust his size. Grab the handle on the top and move it down one pixel. Again, small adjusts make the animation more believable. We are going to create our animation from these two files of the panting dog. We could add more if we wanted to by now duplicating the layer that we just made and making the same or similar adjustment to it.
OK, let's animate this puppy! (pun intended)
So, lets open the "Animation Palette" again in "Frame" mode. You should have the first frame, with it selected, click on the "Duplicate Frame" icon at the bottom, next to the "Trash", twice. We want to start with 3 frames.
Select the first frame and navigate to the "Layers Palette". Find the "Two Pant" layers and turn the "Visibility" OFF.
Now select the next frame (#2) in the "Animation Palette" and turn the "First Pant" layer ON in the "Layers Palette" and the "Second Pant" layer and the "Bulldog Image" OFF.
Then select the 3rd frame and turn the "Bulldog Image" and the "First Pant" layer OFF, making sure that the "Second Pant" layer is ON.
Change the "Frame Duration" of the second and third frames to .05, leaving the first frame at 2 sec.
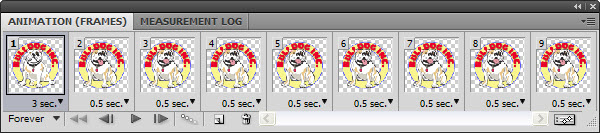

We now have a basic animation, but one pant isn't enough, so we will add more pant frames (Which are frames 2 and 3) by selected those frames and clicking the "Duplicate" button. We will see the two new frames added to the end of the animation do this 3 or 4 times. Then play the animation and see how it looks. The bulldog sits there, pants a few times then returns to the sit position. You can set this to loop or play a few times then stop. However, in this animation I want it to pant a couple of times then stop and return to the original position because I will be using it as a mouse over animation on a website.
That is basically it... this is a simple animation that you can build on if you like by making him blink or scratch his ear, simply by drawing more frames of him doing that. You can try speeding up the pant or slowing it down to see what it looks like. You can also remove the first frame and make a smooth panting cycle by just using the last two frames and having them "Loop".
To save it as an animated gif, navigate to "Save for Web..." in the File" drop down menu. (Tutorial 2-10) You will find animation options and control on the bottom right of the window. I set this to "Forever" though you could set it to anything that you like. You can also adjust the other options you learned in "Tutorial 2-10", Saving Files for Other App's.
Conclusion
Using animation to spruce up a website is very common these days. In fact, animated GIFs have been part of the internet for over a decade. In the early days, people added a half dozen or more animations to a page to attract attention (but actually just created an eyesore). Creating animations is quite easy once you get the hang of it, so practice with this method and it will be second nature.
Reference
Any animator needs to learn the very basic theory of traditional animation.
Have a look at variety of animated GIFs - see what works, what doesn't.
|