Intro
So far most of the tutorials have dealt with raster objects. This tutorial will focus on another aspect of Photoshop - vector shapes. Shapes are great for times when you need a clean edge. Think of a border around your design - it should be sharp and crisp (as long as it matches your design). Shapes can come in many forms: rectangles, circles, polygons and even custom shapes. Learning how and when to use shapes will make you a better designer. You could create these outlines using the Pen Tools, but Shape Tools make the task much easier. View the video at the bottom of the page for more information. Review the Pen tutorial if you haven't already read it. It will explain the differences between Paths and Shapes.
Shape Tools
Being able to add shapes to your image greatly enhances your skill set in Photoshop. Shapes work similar to the Pen Tool that you learned about in Tutorial 1-11. As well as drawing a shape with a pen, you can also draw using a preset tool such as a rectangle. Obviously it should be easier to draw a rectangle than four lines. To get started, I'm giving you a look at the shape flyout and then we'll go through each one.
But before we look at the tools, we're going to have a quick look at the Layers Palette.
Layers 101
Layers allow to you to work in different areas of your image without affecting other parts. For example, when you created text, you created text on a new layer. That way, you could still change the text, and not affect the background. If your image was all one layer, and changes you made to your text would appear on the background color. Layers allow to make a fancy background on one layer, make a border on another, text on another, and foreground object on yet another. You can have as many layers as you like, but you need to keep track of them. Below is an image that shows a design and the layers that were used to create it. See if you can locate each layer in the design.
If you start at the bottom, you'll see a layer called Background - that is the default layer that is created with each new drawing. Above it is the blue shape with rounded corners (which uses a linked mask). Next is the white border around the photo (also using a mask), followed by the photo. The top layers are text, and one has been used to create a shadow. Don't worry about how these objects were made, but notice the structure. You can Click and Drag any layer above the next. The eyeball to the left of the layer name makes it visible or invisible. There is a whole tutorial on layers.
Here is the file used for the example - open it up and click on the layer icon (shown in red above) and play around. Move layers around swap the order, etc. You will learn a lot more about layers in upcoming tutorials.
Back to shapes
The reason I took the detour to show you layers was because they are needed for shapes. In the example above, you saw that there was a blue shape layer. That's all that can be on the layer. So to make a white shape like the above, I I needed a new layer. Shapes don't share layers. But you can use multiple shapes to create one shape by adding and subtracting to the shape (like you do when you use the Marquee Select tools).
Of course with any tool, you know there will be options for you. Here is what the option bar looks like for shapes.
For a change you should see some different icons on the option bar. Of course, the first one on the left is for presets. The next 3 allow to either make a shape (as I described above), make a pen path, or make a pre-defined shape. How the shape will be used will determine your choice. The next two pen-looking tools are used the same as the ones you used in the path lesson, but you can add a custom fill to the outline you draw. After the pens you see some of the shapes you can use, and each will have subtle changes to this option bar. The one that is pressed in, the custom shape tool, allows you to use predefined shapes like the explosion to the right.
The next set of icons define how the shape you draw will react with other shapes.
Create a new shape layer
Creates new layer for the next shape
Add to shape area
Adds to the current shape layer (on the same layer)
Subtract from shape area
Subtracts from the current shape (on the same layer)
Intersect shape areas
Retains only intersecting area of the shapes (on the same layer)
Exclude overlapping shape areas
Removes the the intersecting area of the shapes (on the same layer)
The next button that looks like links of chain controls the next two. When its depressed, it will change the current shape layer to the newly selected pattern or color. When it is not depressed, it will only affect the next new shape layer that you create.
Creating Shapes
Now that you know the theory of shapes, see if you can create something similar to the image below - made only with shapes.
Tip - Press Ctrl+Shift+N to create a new layer (Hey, that's a new Keyboard stroke!).
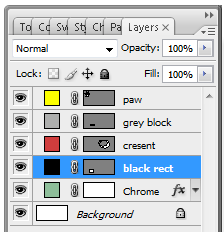
This exercise gives you experience in 2 things. First you will learn a bit about shapes, and second, you may as well get used to being told to create bad designs by your MBA-waving boss. You should see 5 shapes. Hint, the crescent was made from 2 shapes, one subtracting from the other. The rest should be straightforward. To move shapes, resize them or rotate them, you can press Ctrl+T to 'transform' them. When working with shapes and layers, make sure that the shape layer you have active (highlighted in the layer palette) is the one you want to work on. Think of the layer order you need. Here's a screenshot of the layers I used.
You'll also notice that I named the layers. This is very important if you have a lot of them, or if other people will be working on the design.
Conclusion
Shapes are great when you want to have a clear defined edge that is easy to work with. You can also load more custom shapes if you need them. Learning about shapes is also a good step towards learning Adobe Illustrator. Next time you see yourself trying to draw something with the Pen Tool, see if you can draw it as a shape. Also remember that Shapes can be re-sized and still retain their edge crispness.