1-14 : Pick your colors, not your nose

Tutorial 1-1 Intro to Photoshop
Tutorial 1-2 Raster vs. Vector
Tutorial 1-3 Marquee Tool Selection
Tutorial 1-4 Lassos and Magic Wands
Tutorial 1-5 Move Tool & Crop Tool
Tutorial 1-6 Selecting and working with Color
Tutorial 1-7 Fixing Images with the Clone Tool
Tutorial 1-8 Gradients, Fills & Erasing
Tutorial 1-9 Smudge, Blur and Sharpen Tools
Tutorial 1-10 Dodge, Burn and Sponge
Tutorial 1-11 Pen and Path Tools
Tutorial 1-12 Text Tools
Tutorial 1-13 Vector Shape Tools
Tutorial 1-14 Eyedropper / Color picker (& notes)
Tutorial 1-15 Distorting and Transforming
Tutorial 1-16 Introduction to Layers

1-14 : Picking colors with the Eyedropper (and Notes)

Intro
This tutorial will deal with a few tools. One is used frequently, and the others...not so much. The Eyedropper tool allows you to select colors from existing colors in any design or image you have showing. This allows you to copy the exact color from one design to the next. The other tool we'll look at is right next to it. The Notes tool and Audio Annotation tool allow you to leave messages in the design. Check out the video at the bottom of the page for further explanation.

Eyedropper
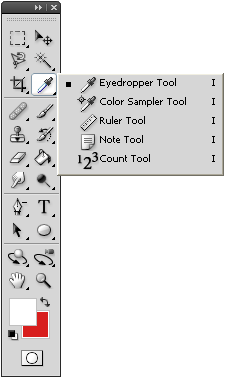
The Eyedropper Tool will turn the cursor into an 'eyedropper' which allows you to Left-click on a color and make it the foreground or current color. It's a great tool that allows for consistency between designs. For example, if you like the colors of a web page button, but not the design, you can use the Eyedropper to copy the color into your own design (assuming you have a screenshot as an image open in Photoshop). Below is the flyout for the Eyedropper and its related tools.

Eyedropper Tool Flyout

You'll see that there are a few options in the flyout that seem unrelated, but they are really all inquiry tools. Press the "I" key at any time to invoke them.

Using the Eyedropper Tool is easy. Open 1 or 2 images and activate the eyedropper. You'll see your cursor changes (like it does with many other tools) and if you start picking on the images, you'll see the foreground color on the toolbar changes to the selected color. You can now use the Brush Tool to start drawing with that color.

The Eyedropper can also be used within other tools. For example, if you want your text color to match something in the photo, you can pick any color in the photo. Try it and see how it works.

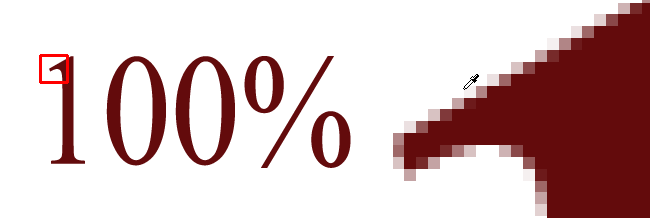
You'll notice that sometimes the color you select isn't the one you want. This is because pixels can change subtly and you need to select the correct one. Picking on text can make this happen. Below is an image that is shown at 100%, and then enlarged (right) - not the subtle differences in color as you get near the edge.

Eyedropper Tool in Photoshop

Now that you see that how colors can change, it's recommended to either zoom in or pick in the middle of the color area.

Color Sampler Tool
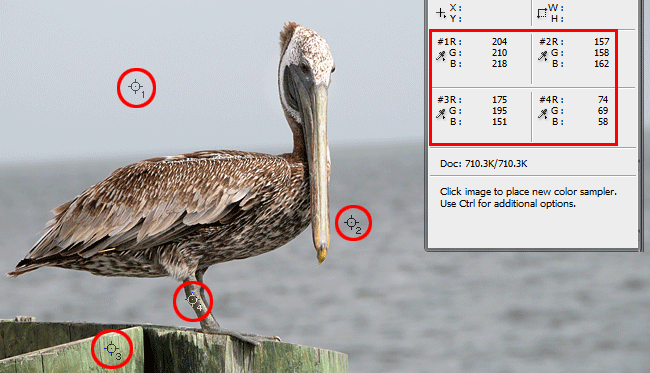
Right below the Eyedropper in the flyout is the Color Sampler Tool. It performs a similar function to the eyedropper, but with one big difference. Instead of make the selected color your active color, it stores it and displays it for reference later. You can then use this information when you need it. Below is a screenshot showing this function.

Color Sampler

For the sake of clarity, I have highlighted the sampled areas in red. So now you know if you want to make your text the color of pier green - you can use sample #3. This is a great tool for designers. It allows to keep your common or needed colors right at hand. Without the tool, you either have to memorize them or write them down.

If you've played with this, you'll notice that you can only have 4 samples available at one time. To remove any of your points, just hold the Alt key down while you are in the Sampling Tool and the cursor turns into a sampler with scissors (don't run with it). This allows you to delete a sample point. You can also Click and Drag the point around the screen to move it instead of cutting it. If you look at the Option Bar, you'll see that you can clear them and start over.

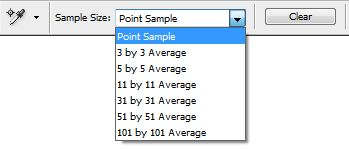
Color Sampler Option

You'll also see a droplist that allows you select the size of the sample. Instead of selected the default of 1 pixel (point). The options take an average of the sample area selected.

Ruler Tool
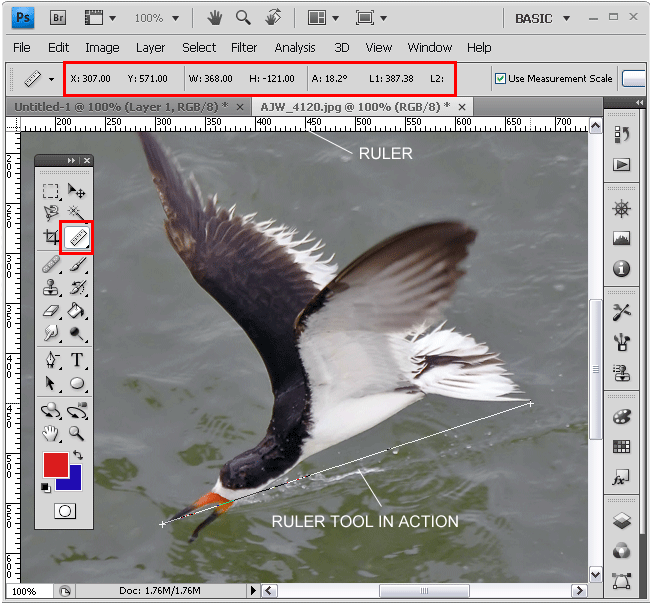
The ruler allows you to measure an area of your image. This can be used to see how your image will fit on a layout, or if you can crop your image and still retain sharpness. In the image below you see the Ruler Tool in action. In the Option Bar there is the data from the current ruler. The Ruler Tool is different from 'rulers' which you see on the left and top of the image area, so be careful when using this terminology.

Ruler Tool in Photoshop

In this example, I picked the tool (shown in red on the toolbar) and then picked at the beak, and then at then of the tail feathers. If you look up to the top, you can see that I drew a red box around what the results of my measurement were. X and Y indicate the first point I selected. W is the width of the selection, while H is the height - in this case a negative number as the second point is higher in the image. A is the angle and L1 is the length of the line.

I could use this tool if I wanted to crop down to a certain size and I know now that bird is 368 pixels wide as a reference.

Count Tool
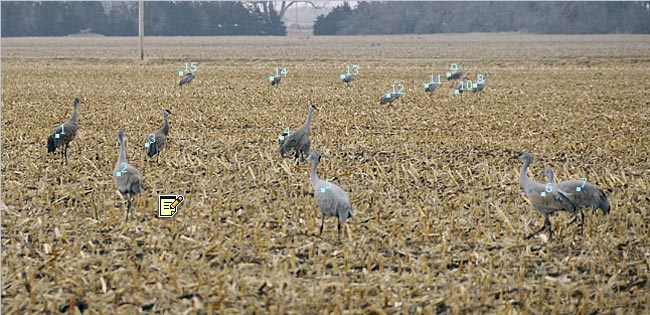
The Count tool counts. Yep - that's it. Each time you pick on the screen a number will be incrementally placed. I don't know how much you'll use this, but I used to count how many Sandhill Cranes are in this photo. And really, haven't found an other practical use for it... though I hear that it has something to do with measuring and analysis.

Photoshop Counter Tool

Note Tool
The note allows you to add a message into the image or design.

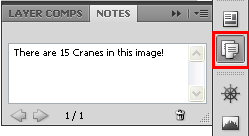
Just select the tool and drag across the screen to make the 'sticky note'. You can then write in any message you like. The note tool is next to the Eyedropper. Just click anywhere on the image and you'll see the mini notepad appear.

Note Tool

You'll also see a writing area on the right of your screen.

If you want to delete the note, just right-click on it and choose Delete Note. Of course there are also some options involved in creating a note such as putting you name is author and selecting a color. Clear All will delete all notes in the current image.

Note Options

If you are working on a collaborative project, adding notes with your name on it is a great way of communicating to others why you changed something, or what recommendations you have.


Conclusion
This tutorial showcased a common tool (Eyedropper) and a rarely used tool (Notes). Both have their uses and can be valuable tools. Using the Eyedropper in an accurate manner will really help you out. Look for it any time you need to select color (like for text). Anytime you see the color palette you can use the Eyedropper. There is also an eyedropper used when setting levels (a later tutorial), so you will notice that it is a common site.

Reference
Learn how to use eye droppers and eye ointment
Here's how to learn music notes

The video content presented here requires JavaScript to be enabled and the latest version of the Adobe Flash Player. If you are using a browser with JavaScript disabled please enable it now. Otherwise, please update your version of the free Adobe Flash Player by downloading here.


<< Previous Tutorial

Return to List

Next Tutorial >>

Owned and operated by The Art Department, Chester, NE
This web site is protected by Copyright 2008 - 2017 ©

Last Update:


Please visit our other sites:

| www.myARTdepartment.com | www.TheCenterofCreativity.com | CustomGamingDesign.com | FreeAutoCADTutorials.com |

myIllustratorsite.com | myAfterEffectssite.com | myAutoCADsite.com