1-15 : Transforming an Image by Distorting its Shape

Tutorial 1-1 Intro to Photoshop
Tutorial 1-2 Raster vs. Vector
Tutorial 1-3 Marquee Tool Selection
Tutorial 1-4 Lassos and Magic Wands
Tutorial 1-5 Move Tool & Crop Tool
Tutorial 1-6 Selecting and working with Color
Tutorial 1-7 Fixing Images with the Clone Tool
Tutorial 1-8 Gradients, Fills & Erasing
Tutorial 1-9 Smudge, Blur and Sharpen Tools
Tutorial 1-10 Dodge, Burn and Sponge
Tutorial 1-11 Pen and Path Tools
Tutorial 1-12 Text Tools
Tutorial 1-13 Vector Shape Tools
Tutorial 1-14 Eyedropper / Color picker (& notes)
Tutorial 1-15 Distorting and Transforming
Tutorial 1-16 Introduction to Layers

1-15 : Transformers: Revenge of the Distorted

Intro
In many cases, you need to distort an image from its standard shape. In Photoshop you can correct Perspective or distort an image to fit a pre-determined size or shape. This tutorial will show the different tools that you can use to make your images different. Some will be used often, others rarely - but it's good to know how to use them. Check out the video at the bottom for more info.

Basic Transformation
The easiest way to transform something is using "CTRL+T". This will make a bounding box that can be adjusted by grabbing the nodes. In the example below, I have two layers, one is the image and the other is text.

Transforming in Photoshop CS4

You'll see that I am transforming the text layer. This is a very common use of the tool. First I made the Text layer active and then pressed CTRL+T. Then I can use a node (highlighted in red) to adjust the size and shape of the image by dragging it. You can open the file and try it for yourself.

Make the text layer active, press CTRL+T. Click and drag to resize. If you grab the corner nodes, you can adjust both vertical and horizontal. Grabbing the inside nodes will adjust either horizontal or vertical depending upon the node. There are some options when using this tool.

Keys used while dragging

Resulting Transformation

NONE

Scale without Constraints

SHIFT

Scales the object to the same proportions.

ALT

Scales the object using the center of the area being transformed.

SHIFT+ALT

Constrains the object, but the transforming is based on the center of the area being transformed.

CTRL

Distort the area in a freeform manner.

CTRL+ALT

Freeform distort based on the area's center.

While the area is highlighted for transforming, you can also Move the area by picking near the middle and dragging. Once you have your area how you want it, press ENTER. To cancel the transformation, press ESC.

Using CTRL+T also allows you to rotate the area. This is done by moving your cursor outside of the bounding box near any of the nodes. If you press the SHIFT key while rotating, you can rotate to a precise vertical positron as the you are now locked into 15° increments. Also, you can change the location of the pivot/center point by clicking and dragging it.

Pivot Point

You can see how using something as simple at CTRL+T can give you a lot of flexibility. These tools are also accessible from the Edit menu.

Transform Menu in CS4

Looking at the menu, you'll see that the first item (Again) is grayed out. This is because the image has not previously been transformed. Using this option allow you to apply the same transformation that was previously used.

The next two items, Scale and Rotate were both shown about and can be accessed much faster using CTRL+T than the menu. Another way to start to Transform is to highlight an area with a marquee tool, then right-click in that area. Choose either of the transform items in the menu.

Right Click on Selected Area

Skew
Skewing is used to distort the area either horizontally or vertically. Grabbing a node along the top or bottom will allow you to slant the area and an angle to the left or right. Grabbing a node on the side lets you skew up or down. Note that the indicator under the cursor changes just like when you are rotating.

Skew in Photoshop

Another way of skewing is to enter in a precise angle in the option bar.

Transform Options in CS4

If you look at these options, you'll see that there are ways to precisely transform you objects. Try transforming by typing directly into the option bar.

Distort
Using Distort will dramatically change your image. In this example, I have used the distort transformation to give the photo a perspective look. I also added a Drop Shadow to give the look more depth.

Transform Options in CS4

Distort can used for a variety of special looks to make your designs more dramatic and visually exciting.

Perspective
Using perspective can be used to correct photos or to create an effect. If you've learned from the previous examples above, you should already have an idea how it works - but this tool has one difference. When you grab a node, it 'controls' the one on the opposite side as well.

If you've seen Star Wars, this has to look familiar. Actually even if you haven't seen the movies, you seen the parodies. This is a very easy effect to create by using Perspective Transforming. In this example, I started with a block of paragraph text. If you try this with regular (non-paragraph) text, you can't do it until you rasterize the text.

To give this a shot, start with a black background. Create a block of text with a white color. Now select the Pointer or some other tool (remember, Transform doesn't work with the text tool active) and navigate to Edit > Transform > Perspective.

Now you'll see the regular bounding box. Grab the top left node and move it towards the middle. You should now see how "Star Wars" text is done. Use the same process to change buildings or add depth to an image.

Perspective Text

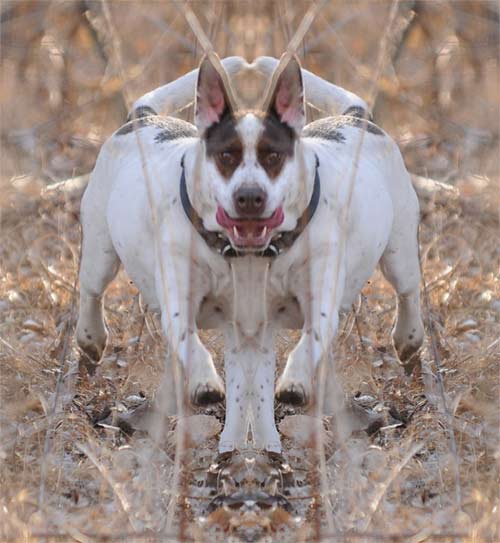
The rest of the items in the list are pretty straightforward (except for Warp). Rotate 90 or 180 degrees is really handy for rotating photos before your start editing them. Flip Horizontal will mirror the selection from left to right. Flip Vertical will mirror the selection from top to bottom.

See if you can figure out how to create something like the image below using Flip Horizontal.

Mirrored Image

Distort with a Warp
Using a Wrap in Photoshop isn't always an easy task. Warps are used to give dramatic distortion to and area. With a Warp, you can treat the image like silly putty. Below is an example of one way to use a Warp.

No Warp   Warp in Photoshop

I have taken the regular straight text and Warped it to give the look that it is part of the label. On problem which you can see is that although the change looks better, the sharpness of the edges is gone due to the Wrap.

When you are using the Wrap tool, you are pulling the image around using nodes on a mesh that surrounds the selected area. You can drag the corners and the top and bottom lines; it's almost like modifying a path. Here I have zoomed in on the image to see the mesh better.

Using the Warp tool in Photoshop

You'll find this tricky to work with at first, so one idea might to be to line your text up with something you can reference it with on the image like where the red meets the white on the can. Here is the file so you can try this. For extra practice, open an photo and warp it, then try to use the warp tool put it back to normal.

Distorting with Filters
Another way to distort an area is using the Distort Filters. Filters are covered more in this course, but let's look at some while we're on the subject. Navigate to Filters > Distort and you will see a few more options.

Distort Filters in Photoshop

We're just going to look at one option for now, but play with the others and see what they do. Start with a selection of something and then Navigate to Filters > Distort > Spherize - you'll see this dialog box pop up.

Spherize Dialog in CS4

This is used to give a rounded effect to images and text. If you move the slider to the right, the distortion moves the selection in on itself, move it to left and it expands the selection. You can see that there are options for Horizontal or Vertical distortion only. Try an effect and UNDO to try another. See what happens if you combine distortions.

Keep in mind that if you expand the selection, you are enlarging the image area, and you'll likely cause a loss of sharpness. You can get away with this if you start with a large image, distort it and then make the image smaller. Try this effect on some text and think about how you could use it.


Conclusion
I will guarantee you that you will use the Transform tools a lot in your everyday Photoshop use. Not every image or block of text will be the size you need it. You can use these tools to correct of distort - they're very versatile. Remember these options and the keys that work with the tool.

Reference
Check out the Transformers: Revenge of the Fallen movie (or not, it's really not much of a movie).
Read about the Warp Drive on the Enterprise.

The video content presented here requires JavaScript to be enabled and the latest version of the Adobe Flash Player. If you are using a browser with JavaScript disabled please enable it now. Otherwise, please update your version of the free Adobe Flash Player by downloading here.


<< Previous Tutorial

Return to List

Next Tutorial >>

Owned and operated by The Art Department, Chester, NE
This web site is protected by Copyright 2008 - 2017 ©

Last Update:


Please visit our other sites:

| www.myARTdepartment.com | www.TheCenterofCreativity.com | CustomGamingDesign.com | FreeAutoCADTutorials.com |

myIllustratorsite.com | myAfterEffectssite.com | myAutoCADsite.com