Level 2 : Photoshop Tools Expanded

Tutorial 2-1 Layers & How to Use Them
Tutorial 2-2 Layer Styles & Blending Options
Tutorial 2-3 What are Channels for Anyway
Tutorial 2-4 Masks that make you look cool
Tutorial 2-5 A Quick Look at Filters & Plug-ins
Tutorial 2-6 Hip and Trendy Styles
Tutorial 2-7 Artistic Brushes, expanded
Tutorial 2-8 Patterns; Fills & Backgrounds
Tutorial 2-9 Actions, Scripts & Automation
Tutorial 2-10 Preparing & Saving Files

2-1 : Layers & How to Use Them

Intro
I remember back in the day (1994 to be exact) when layers were first introduced to PS. Being old school, I didn't want anything to do with them but now, I won't do anything without them. And now you can combine them into folders and add layer masks, making them even more powerful. In this tutorial (as in 1-16) we will discover how to use them and what makes them so great. Have a look at the video at the bottom of the page when you are finished reading for more information.

Made In America

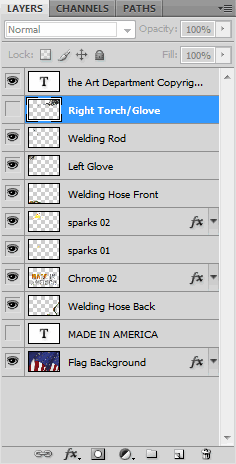
To get a better understanding of how layers work, we are going to dissect the layers of this graphic that I made for one of my gaming clients. You'll see that it is actually made up of 11 layers. The order of the layers are very important and should be stacked in an order that places the items in the layers properly. For instance, here the "Right Torch/Glove" is on top of everything.

Changing the Visibility of a Layer

Made In America
Layer "Right Torch/Glove" with all other layers turned off.

Made In America
The image with everything turned on BUT the "Right Torch/Glove" layer turned on or visible.

The top image is the layer alone.
The image below that is the full image with that layer turned off. (to turn a layer off, you simply click on the "eye" icon next to the layer in the Layer Palette.

Photoshop Layers

Moving Layers

Made In America

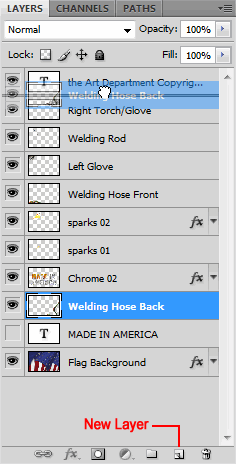
Reordering layers is as easy as "Click & Drag". Click on the layer that you want to move, Drag it to the position that you would prefer it to be and then let go of it (look for the double line that shows where it will be placed). As you can see here, I have taken the "Welding Hose Back" layer and moved it to the top. The hose is now over the Made In America text and obscures the "A". This makes it hard to read... we'll move it back by Clicking & Dragging it to it's proper place.

Made In America

To change the name of the layer, double click on it in the Layers Palette and a box will open allowing you to type anything that you want. I find it very important to properly name the layers because once you have a file with 50 layers it can get very confusing, very fast and you'll waste a lot of time searching for the layer that you are looking for.

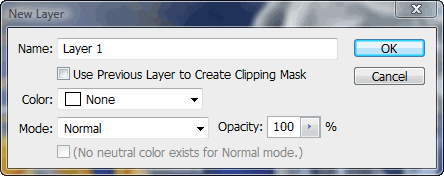
Now that you have the basic understanding of how layers work, lets add a layer. There are a couple of ways to do this (like anything in PS). If you click on the "Add Layer" icon in the bottom right of the layer Palette, the one that looks like a page turning, it will automatically add a new layer titled "New Layer" above the layer that you have active. The second way to do this is by navigating to the upper right corner of the layer Palette and click on the more options icon or "Shift +Ctrl +N". Either of these ways will bring up a dialog box that should be pretty self explanatory.

PS Add New Layer

Now is a good time to give the layer a name, you can change this later if you like. The Color Choice option allows you to give the layer a specific color, this makes it stand out in the Palette You can also use this to track common layers by giving them the same color.

We'll look closer at the "Opacity" and "Mode" options later.

As described in level 1-12, to add a new Text Layer, select the "Text" tool from the "Tool Bar" and click on the image and start typing. A new layer will automatically be added above the active layer.

Layers can be Linked, Merged, Grouped, and Flattened (as in tutorial 1-16). It's important to know when to do each.

PS Layers

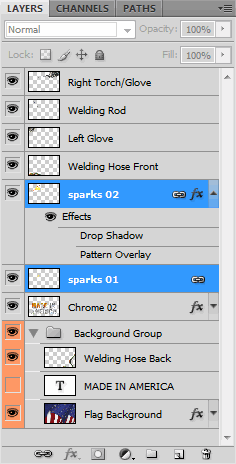
First you need to know how to Select Layers. You can select individual layers by holding down the "Ctrl" key and clicking on the individual layers in the "Layer Palette". Or if the layers are in order, you can select a series by holding down the "Shift" key and click on the first layer in the series, then with the "Shift" key still active, click on the last layer in the series. All layers in between the two will be selected.

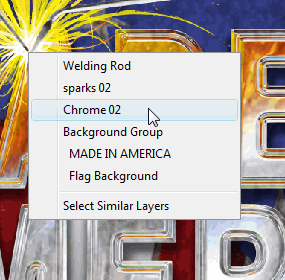
In the screen shot to the left, you'll see that you can "Right Click" anywhere in the workspace and a drop down menu, listing all the layers at that particular point, will appear. You can then select any of those layers by moving your curser over the layer of choice and click on it to make it active. You also have the option to "Select Similar Layers". By choosing this option everything that is similar to the currently active layer will be selected. So, if you have a text layer active and you select similar then all of the text layers will be selected.

PS LayersSelect- Let's say that you have 10 layers that have related objects. You want to move them all to the left a little bit but keep their relationship to each other the same. So, you can Select the layers in the "Layers Palette" then move them using the Move Tool in your workspace.

Link- Let's say that you want to take the same 10 layers and reposition their Layer Order within the image. You would select the 10 layers and then Link them together, you can now Move them together within the Layers Palette and in the Workspace at the same time. You can link and unlink layers without removing the ability to edit them. Sometimes you will want to keep them linked together to move later and not have to select them again, it is more efficient to "Link" them instead of just "Selecting" them.

Merge- Let's say that you have 10 layers positioned to make one image, but they are on separate layers. You don't want to make anymore changes to them so you want to make one layer out of them. This is when you would "Select" all of the layers and then "Merge" them together by right clicking on one of the selected layers in the "Layer Palette." and clicking on "Merge Layers" in the drop down menu. If they are linked, you can select one of the layers, "Right CLick" on it and select "Select Linked Layers" from the drop down menu to select them all without clicking on them individually. You then right click and select "Merge Layers". You will also see "Merge Visible" this will merge all of the layers that are visible. Or "Merge Down", which will merge the active layer with the layer below it.

Grouped- Both "Selected" and "Linked" layers can be "Grouped". Let's say that you have your 10 layers linked and want to keep them together but you want to move them independently of each other as well. You would "Select" the link set then click on the "Layers Option" icon in the upper right of "Layer Palette". From the drop down menu, select "New Group From Layers". This will open a familiar dialogue box where you can set options for your new group set. You will find an arrow that will open and close a list of the layers in that group. Layers within a group set work exactly the same as if they weren't. With your layers in a group you can now treat the "Group Set" as one layer or open it and edit any of the layers. This is a very handy way to reduce the overall number of layers that you have to weed through when working on a complex design.

Flatten- This is the LAST thing that you want to do, unless you are finished with the project and NEVER want to edit any of the layers again (because they will be gone forever). I have never had a reason to do that... I prefer to "Save As" a JPG and save the PSD file too, you never know if you'll have to make changes at a later date. By the way, your boss or client will ALWAYS want changes later.

Note: It is important to know that you if you have a layer in a group and you want it to be on top of a layer that is not within that group, you will need to remove the layer from the group and reposition it's order. It will not be part of the group anymore so if you make adjustments to the group layer that is belonged to, you might need to make the same adjusts to the individual layer.


Conclusion
The more complex the image you have, the more layers and groups you will have. A well organized file will be easier to hand off to some else to work on. Plan ahead and name your layers and groups to make your job easier. Also pay close attention to your "Layer Order" so that you don't hide anything that you don't want hidden. There are many types of layers which we will cover in other tutorials. Layer Styles, Layer Masks, Layer Adjustments are all important things to know and understand well.

Reference
From "Display" to "ImagePro" to "Photoshop" and beyond!

The Camtasia Studio video content presented here requires JavaScript to be enabled and the latest version of the Adobe Flash Player. If you are using a browser with JavaScript disabled please enable it now. Otherwise, please update your version of the free Adobe Flash Player by downloading here.


<< Previous Tutorial

Return to List

Next Tutorial >>

Owned and operated by The Art Department, Chester, NE
This web site is protected by Copyright 2008 - 2017 ©

Last Update:


Please visit our other sites:

| www.myARTdepartment.com | www.TheCenterofCreativity.com | CustomGamingDesign.com | FreeAutoCADTutorials.com |

myIllustratorsite.com | myAfterEffectssite.com | myAutoCADsite.com