2-7 : A Brush with Greatness
Brushes come in all different sizes and shapes, the possibilities are endless, and like many other tools, have presets. You can change every aspect of a brush in an almost unlimited way. From roundness, to density, to size, and a whole slew of other options, then save it to use later. In this tutorial we will cover the basics of brushes and as you become more familiar with PS, you can expand your knowledge with these tools and others. But this is a Basic
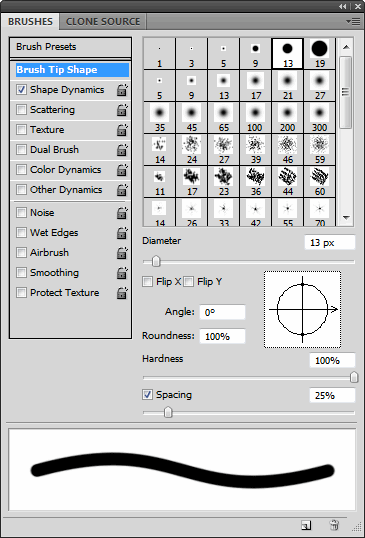
In this example we have a default brush called "Hard Round 13". What this means is that it has a "Brush Size" of 13px, with a "Hard Edge", and "100% Round Shape". The example box on the bottom of the palette shows you what the stroke will look like when used.
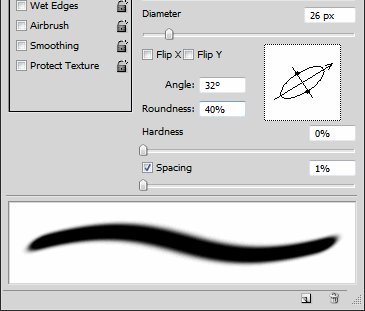
Ok, now we'll make some changes to it so you can see how easy it is to adjust a brush. I've enlarged the "Diameter" to 26px, set the "Hardness" at 0% to soften the edge of the brush. And most importantly, reduced the "Roundness" of the brush to 40% and changed the "Angle" to 32 degrees. By changing the angle we have created a calligraphy brush. Try drawing on a blank workspace to see what it does. Also, change the "Hardness" to make the edge more defined. (0% is the softest edge and 100% gives you the hardest or more defined edge) Another way to quickly change the "Diameter" and "Hardness" of a brush is to "Right Click" in the workspace. A dialog box will open with these options and all of your active brush presets.
A brush stroke is made up of repeating "Brush Tips". You can adjust how closely they are repeated next to each other by changing the "Spacing" of a stroke. The sample on the left has the spacing set to 125% and the other has a "Jitter" setting with a "Roundness Jitter" setting of 50% (see how the dots aren't exactly round?) . This should give you a good idea of how strokes work.
"Shape Dynamics" will allow you to adjust how the pen works. If you are using a digitizing pad (Graphics Tablet), you can set the brush stroke to respond to the "Pen Pressure". Over the years I have had a couple pads and never ended up using them much, but they are very handy when creating a complex drawing with pixels. A "Stylus Wheel" is the same thing, I have friends that wouldn't work without one. Personally, I am able to make my mouse do whatever I need it to do. Photoshop allows you to make some settings to your stroke that will react as if you were using a pressure pen, in more of a predetermined way.
You can also set the "Jitter" of your line, which is very useful if you want the stroke to look like it's draw with by hand, giving it an uneven edge. This example has a "Jitter Size" of 50% You can also set the "Scattering" of the stroke. The more "Scatter" added, the less the brush tip will be constrained to the path of the stroke. This is very handy when painting grass or leaves using an object brush. The example on the left is the "Object Brush" tip "74" with "Spacing" of 125% and the other has a "Scatter" setting of 300% added to it.
Once you have a brush set to something that you like, you can save it as a "Preset" by opening the drop down menu in the upper right of the "Brush Palette" and choosing "New Brush Preset...". A dialog box will open and ask you to name it. This is important, learn early to organize your all of you presets as well as your files, I can't stress that enough. You'll also want to make sure to "Save" your brushes before you close your program. And like with "Styles" you can open more "Brush Libraries" (See 2-6) and append them to the current list or replace the current list. Then return to the default set if you get overwhelmed with brush tips in your palette.
Conclusion Reference |
|||
<< Previous Tutorial |
Return to List |
Next Tutorial >> |
|
Owned and operated by The Art Department, Chester, NE |
Last Update: |
 You can use brushes to draw some pretty intricate designs or just add fancy outlines. Once you have mastered the brush tool though, you might not ever want to pick up a real paint brush again... Ok, maybe that's not true. But you could land a great job drawing backgrounds for the game industry. Don't forget to check out the


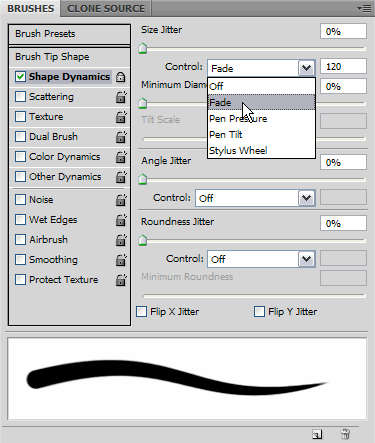
 To explain this better, lets look at the "Shape Dynamics" options. Here I have changed the "Control" to "Fade" (it you choose, for example "Pen Pressure" a warning triangle will appear next to it, which means that you can't use it because you don't have that device installed.) I have also changed the length to 120, the higher the number the longer the stroke, the lower the number the shorter the stroke. You now have a long 19px, round, stroke, with a hard edge and tapered end. When drawing with this brush, where you start your stroke will be thicker and the end will fade, no matter which direction you draw your line.

