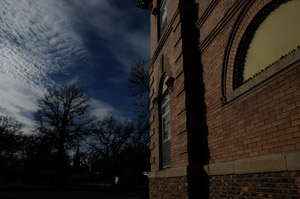
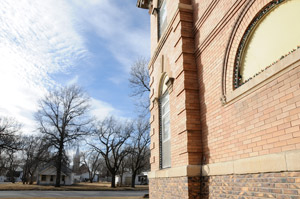
3-11 : High Dynamic Range ImagesIntro In Photography, Dynamic Range is a term used to describe the range of exposure from lightest to darkest. In a normal exposure that Range is limited by the camera's sensor. Your eye is a magnificent machine and has a great dynamic range. The problem is that you sometimes want more Range than your sensor provides. Photoshop has the ability to combine multiple images into one to increase the range of exposure.
This effect also has the reputation of being overdone, and some images look almost cartoonish. The main thing to remember is that you are the artist, and you can use this tool as you please. Merge into HDR
If you don't have images to work with, here are the two from the sample above. HDR_1 - HDR_2 You start the process by navigating to File > Automate > Generate HDR. This will open a dialog box that will allow prompt you to add the files you want to merge. Browse to the folder where your files are and select them.
There is a checkbox that will give you the option of aligning the images. Check this box if you took the photos without the aid of a tripod (not needed if you're using the samples from above). After you click OK, Photoshop will do its magic and merge the images. From there it will display the merged image and allow you to make some changes.
Here you can set the bit depth (32, 16 or 8) and set the White Point. Set it to 16 Bit/Channel for this example. I usually slide the white point to the right of histogram so that my highlights are not clipped. Press OK to go to the next step. When you do this, you will get yet another dialog box - this one for HDR Conversion.
Switching the droplist at the top to "Local Adaptation" gives you a wider range of options. See how I adjusted the sliders and the Toning Curve below.
I did this to get the most dynamic range from my HDR image. Of course you are free to go crazy and try different settings - you can always start over and try all kinds of settings. Press OK in the HDR Conversion dialog box. Now that you finally see your image in Photoshop, it may not look exactly like your preview. After you have the image in 8 or 16 bit, you can use the Shadow/Highlight tool (or Levels) to make more precise and final adjustments to the exposure. If you want, add some sharpness and you're done.
Conclusion If you are shooting photos for use with HDR images, try to use a tripod or other firm surface. Make a wide range of exposures and try merging different images and remember you can merge more than 2. Depending upon your end use, you can overdo the effect. Not all images need HDR. Some scenes work great with harsh contrast. Of course the real challenge is to get the most range in your camera. This is sometimes done with a Graduated Neutral Density
Filter. Reference |
|||||||
<< Previous Tutorial |
Return to List |
Next Tutorial >> |
|||||


Owned and operated by The Art Department, Chester, NE |
Last Update: |