Level 3 : Working with Photographs

Tutorial 3-1 Introduction to Exposure
Tutorial 3-2 Correcting Image Exposure
Tutorial 3-3 The Basics of Color
Tutorial 3-4 Correcting Image Color
Tutorial 3-5 Increasing Sharpness
Tutorial 3-6 From Color to Black and White
Tutorial 3-7 Resizing and Cropping
Tutorial 3-8 Images for the Internet and Email
Tutorial 3-9 Correcting Lens Distortion
Tutorial 3-10 Adding a Soft Focus Effect
Tutorial 3-11 High Dynamic Range Images
Tutorial 3-12 Creating Panorama Compositions
Tutorial 3-13 Hand Coloring a B&W Photo

3-12 : Creating Panorama Compositions

Intro
There are times when the image size of your camera just isn't big enough. I know that I've been on beaches that just seem to go on forever, but my camera is limited in that it takes only so much of the scene. In some cases you can buy a wide angle lens that will see most of the beach, but many cameras don't have that option.

Fortunately, Photoshop offers a solution. If you take a series of photos, Photoshop will stitch them together for you and provide one long photo. This process is automatic and easy. This tutorial will show you how it's done and how to take photos for this reason.

The Goal
What we want is 2 or more images that overlap at the edges. Below is an example of how I took 6 photos in the front yard and Photoshop combined them automatically.

Merging Images in Photoshop

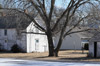
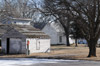
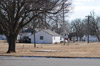
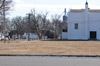
You should notice that in the 6 individual shots, there is noticeable overlap. I like to make sure that I have some room to spare. I think that you get the idea - shoot images that overlap and let Photoshop put them together.

Shooting the images
Not everyone will have a camera that allows these options, but this is the best way to do it. Here are the steps I use when shooting images for stitching. Use as many as your equipment will allow.

Get exposure as accurate as possible
Use a manual setting for shutter speed and aperture (to maintain consistent exposure)
Use a standard or preset white balance (not Auto - to maintain consistent color)
Use a tripod
Make the camera as level as possible (use a bubble level)

If you use an automatic exposure setting, there is a really good chance that your separate images will have separate settings and one image could be darker than the one next to it. Using manual settings ensures that all exposures are the same.

If you have an old version of Photoshop, you will need to align and blend the images manually.

If you don't have any images to work with, you can download this ZIP file that contains the sample from the above panorama. Save the files and extract the images to a folder on your hard drive before proceeding.

Automating the Process

Now that you have your images to merge together, you can begin. Navigate to File > Automate > Photo Merge. This will open up a dialog that looks like the one below.

Photo Merge in Photoshop

The first thing to do is the hit the Browse button. This will allow to select files for merging. Click the first file then to select more, use the CTRL key to pick them one at a time, or the Shift key (click on the first file and the last file and every file in between will automatically be selected) to select a series.

Once you have them in your list (as shown above), you can select the OK button and let Photoshop do its thing. You'll end up with an image that looks something like this.

Panorama in Photoshop

In this example, you can see what happens when your camera is not perfectly level, I wanted to show you this so you will see how to work with it. In this example and many others you work with, you will need to crop some of the image away. The amount that gets cropped away will depend on how well aligned your images are.

Cropping a Panorama

After the crop is complete, flatten the image (right click on the layer and choose that option) and make your modifications for exposure, contrast, etc. If you are working with large images, your computer may get noticeably slower as it works with a large amount of data (sounds like a great excuse to get a new computer).


Conclusion
Merging photos is a great way to create images that you normally can't make with just one. Once you get used to this technique, you can shoot 2 rows of images and create even larger photos. Try shooting with your camera in the vertical (portrait) position for more options. Look for scenes that will lend themselves to this type of work. Don't forget that you can do vertical compositions as well such as for skyscrapers.

Reference
The Magic Mirror of Life The Dark Room- I have always wanted one of these for the living room!
A Panoramic View Many of the first Camera Obscuras were large rooms
Check out Gigpan.org - a online gallery of huge panoramas.


<< Previous Tutorial

Return to List

Next Tutorial >>

Owned and operated by The Art Department, Chester, NE
This web site is protected by Copyright 2008 - 2017 ©

Last Update:


Please visit our other sites:

| www.myARTdepartment.com | www.TheCenterofCreativity.com | CustomGamingDesign.com | FreeAutoCADTutorials.com |

myIllustratorsite.com | myAfterEffectssite.com | myAutoCADsite.com