Level 3 : Working with Photographs

Tutorial 3-1 Introduction to Exposure
Tutorial 3-2 Correcting Image Exposure
Tutorial 3-3 The Basics of Color
Tutorial 3-4 Correcting Image Color
Tutorial 3-5 Increasing Sharpness
Tutorial 3-6 From Color to Black and White
Tutorial 3-7 Resizing and Cropping
Tutorial 3-8 Images for the Internet and Email
Tutorial 3-9 Correcting Lens Distortion
Tutorial 3-10 Adding a Soft Focus Effect
Tutorial 3-11 High Dynamic Range Images
Tutorial 3-12 Creating Panorama Compositions
Tutorial 3-13 Hand Coloring a B&W Photo

3-6 : From Color to Black and White (and Sepia)

Intro
Long before there was color film, there was black and white. To many people, black and white photos are a more pure expression of the art. Black and white photos also hearken back to a time of less complication. Your parents or grandparents probably have a shoe box of old black and white photos.

Digital cameras record in color. Sometimes you might take an image that you feel doesn't need color to show its message, or you want to make it simpler and set it up for newspaper print. Photoshop can do that for you. And there are a couple of ways of doing that.

Remember a good black and white photo has to stand on its own without color to help support it. It needs great exposure and a subject that compliments the medium. Not every color image can become a successful black and white image. The more you work with it, the easier you'll be able to make those distinctions. Don't forget to view the video at the bottom of the page for more information.

Color Mode
The easiest way to convert a color image to B&W is to change its color mode. This is done by opening the image and navigating the menu to Image > Mode > Grayscale. If you answer yes to the dialog box, you will lose all color information for this image - meaning you can't go to Image > Mode > RGB Color and change the B&W photo back to color. I highly recommend that you save a color version of your image before converting to grayscale. You can adjust exposure either before or after you convert to grayscale.

Desaturate
Another simple way to get rid of color is to open your image, navigate to Image > Adjustments > Desaturate. This will remove the color and leave you with a grayscale image, but you can still add color to it because it is still an RGB or CMYK image. Note that you can't bring back the former colors you had.

Channel Mixer
This adjustment works by allowing you to adjust the individual color channels (red, green, blue) and see their effects as a B&W image. You remember how images are made up Red, Green, and Blue to create all the colors, so this exercise allows you to work with it first hand.

To work on this, I recommend that you use this image or one that has bright contrasting colors. This will allow you to see the effects clearly and help you work on other images where the changes might not be as noticeable.

With your image open, navigate to Image > Adjustments > Channel Mixer. This will open a dialog box like the one below.

Channel Mixer in Photoshop

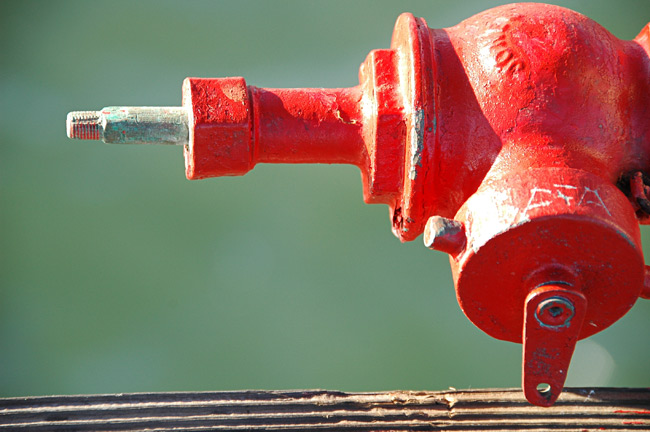
You'll see 3 sliders, one for each color, and most importantly there is a checkbox at the bottom left for Monochrome. Check this box and then start sliding! You'll see that if you slide the red slider to the right the valve gets lighter, to the left and it gets darker. The green and the blue will adjust the water to varying degrees. This dialog gives you great control over your image. Generally you will want to avoid extremes unless you are going for a high contrast look.

You can also select specific areas of your image to adjust (unlike the Color Mode method above). Which means that the color information is still available in your image - this will give you more flexibility.

Black and White in Photoshop

Which looks better? Who knows - that's your call as a photographer and artist. This method is available in all versions of Photoshop (unlike the next approach).

Black and White Adjustment
This is a new tool for Photoshop (CS3, I think) and it gives you even more power than the channel mixer. Look at the image below and see if you can tell why.

Black and White in Photoshop

If you guessed "More sliders gives me more control" - you are correct! (Sorry, no prize though). This dialog box works just like the Channel Mixer, except you don't have to check the Monochrome box and you have more colors to control. Like the channel mixer, you can also add color to your image later as it is still an RGB image.

Below is the image that I have adjusted using the Black and White tool.

B&W in Photoshop

I don't know about you, but I think I was able to coax out some more subtle tones using the Black and White tool - especially in the shadows. I would recommend getting used to the Channel mixer first (you can also use this for color images). Of course if you don't have CS3 or higher, this will be your only choice. To get to the Black and White tool, navigate to Image > Adjustment > Black and White. Also note that there is a checkbox for Tint. Checking this allows you to add a color tone such as sepia to your image.

Hue/Saturation (and Lightness)
The final method I will show you is using the Hue/Saturation method as a quick way for making sepia toned images. This is a much cruder way, but can be used when you don't want to spend a lot of time or don't feel you have the expertise for mixing channels. With your image open, navigate to Image > Adjustments > Hue/Saturation. You should see this dialog box.

HSL in Photoshop

The key here is to check the Colorize checkbox. This will change the image to monochrome (but also retain color information). Now you can adjust the sliders to get the effect you want. Hue changes the color, Saturation changes the amount of color and Lightness adjusts the brightness of the image. This is a quick and easy way to create an older look to your photo.

Here's my version of a sepia toned image (your results may vary).

Sepia toned in Photoshop

Selective Color
Another way of working with B&W is to have part of your image in color, and the rest in black in white. This allows you to highlight part of the image. You can select any part of the image using masks or just select with marquees and then use any of the methods above to remove the color.

Selective Color

Exploring the world of B&W can be fun. There are also third party filters (also called Plugins) that will even allow to select a tonal range that is based on an actual film, or allow you to add creases and coffee stains. Have fun with it.


Conclusion
Photography started out as black and white, and even today you can explore it with a variety of methods. Some images work a lot better than others. Portraits work well and any photo of an older scene (old buildings, gadgets, etc). Look for images that have some contrast, but don't rule out very low contrast scenes (foggy landscapes). Experiment with the different methods and remember that (excepting the first one) they can also be used to adjust color images.

Reference
View the work of Ansel Adams - a master of black and white photography.
View black and white photos on Flickr - see what works and what doesn't.

The video content presented here requires JavaScript to be enabled and the latest version of the Adobe Flash Player. If you are using a browser with JavaScript disabled please enable it now. Otherwise, please update your version of the free Adobe Flash Player by downloading here.


<< Previous Tutorial

Return to List

Next Tutorial >>

Owned and operated by The Art Department, Chester, NE
This web site is protected by Copyright 2008 - 2017 ©

Last Update:


Please visit our other sites:

| www.myARTdepartment.com | www.TheCenterofCreativity.com | CustomGamingDesign.com | FreeAutoCADTutorials.com |

myIllustratorsite.com | myAfterEffectssite.com | myAutoCADsite.com